


简介
在我们检测到人脸区域之后,接下来要研究的问题是获取到不同的脸部的特征,以区分不同人脸,即人脸特征检测(facial feature detection)。它也被称为人脸特征点检测(facial landmark detection)。
人脸特征点通常会标识出脸部的下列数个区域:
右眼眉毛(Right eyebrow)
左眼眉毛(Left eyebrow)
右眼(Right eye)
左眼(Left eye)
嘴巴(Mouth)
鼻子(Nose)
下巴(Jaw)
dlib提供了训练好的模型,可以识别人脸的68个特征点
import dlib
import cv2
# 使用 Dlib 的正面人脸检测器 frontal_face_detector
detector = dlib.get_frontal_face_detector()
# Dlib 的 68点模型
predictor = dlib.shape_predictor("shape_predictor_68_face_landmarks.dat")
# 读取图片
img = cv2.imread("2.jpeg")
# 生成 Dlib 的图像窗口
win = dlib.image_window()
win.set_image(img)
# 使用 detector 检测器来检测图像中的人脸
faces = detector(img, 1)
print("人脸数:", len(faces))
for i, d in enumerate(faces):
    print("第", i+1, "个人脸的矩形框坐标:",
          "left:", d.left(), "right:", d.right(), "top:", d.top(), "bottom:", d.bottom())
    # 使用predictor来计算面部轮廓
    shape = predictor(img, faces[i])
    # 绘制面部轮廓
    win.add_overlay(shape)
# 绘制矩阵轮廓
win.add_overlay(faces)
dlib.hit_enter_to_continue()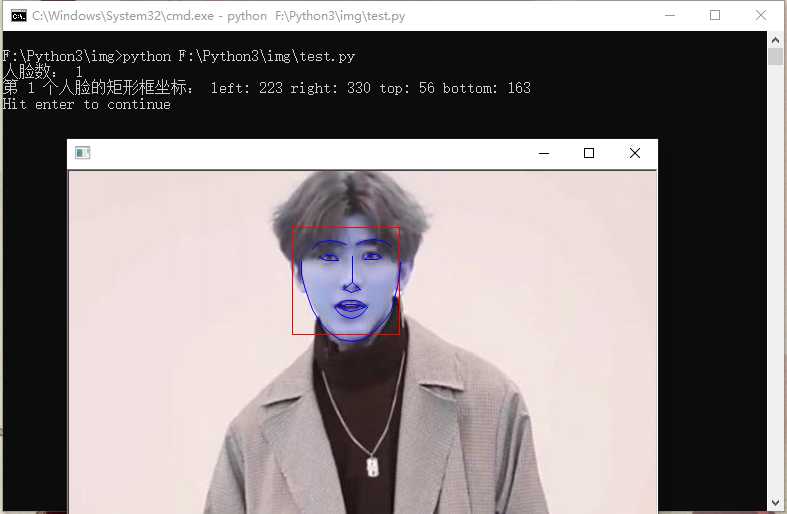
完整示例:
import cv2
import dlib
# 读取图片
img_path = "1.jpeg"
img = cv2.imread(img_path)
# 转换为灰阶图片
gray = cv2.cvtColor(img, cv2.COLOR_BGR2GRAY)
# 正向人脸检测器
detector = dlib.get_frontal_face_detector()
# 使用训练完成的68个特征点模型
predictor_path = "shape_predictor_68_face_landmarks.dat"
predictor = dlib.shape_predictor(predictor_path)
# 使用检测器来检测图像中的人脸
faces = detector(gray, 1)
for i, face in enumerate(faces):
    # 获取人脸特征点
    shape = predictor(img, face)
    # 遍历所有点
    for pt in shape.parts():
        # 绘制特征点
        pt_pos = (pt.x, pt.y)
        cv2.circle(img, pt_pos, 1, (255,0, 0), 2)
cv2.imshow('opencv_face_laowang',img)  # 显示图片
cv2.waitKey(0) # 等待用户关闭图片窗口
cv2.destroyAllWindows()# 关闭窗口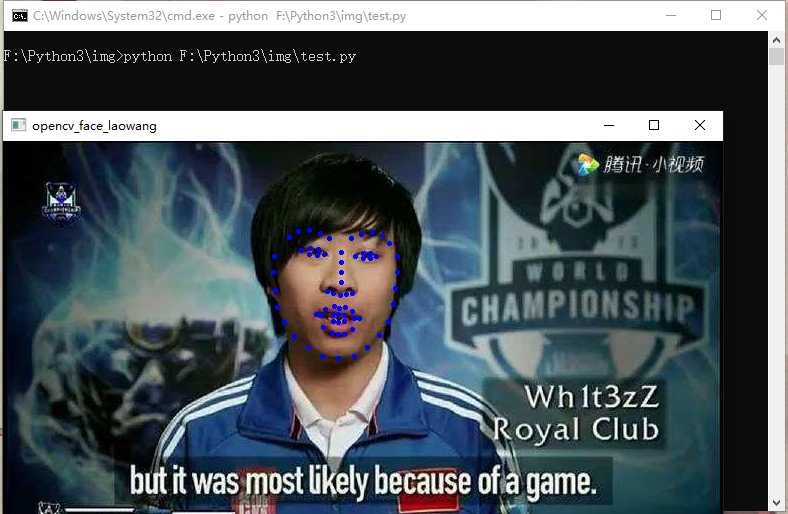




评论 (0)